Sending Attachments Using PHPMailer and Gmail SMTP
Updated: 11-Nov-2025 / Tags: PHP Tutorials / Views: 125
Introduction
Sending emails from a web application is a fundamental feature, but handling file attachments—especially multiple files—can be tricky. How do you create a smooth user experience for uploads while managing them efficiently on the server?
This tutorial provides a complete, step-by-step guide to building a robust email attachment system using PHP and the powerful PHPMailer library. We'll configure it to send emails through your Gmail account, a reliable and free SMTP service perfect for development and small-to-medium applications.
We will build a complete, standalone application that features:
- A modern, user-friendly HTML form.
- A sleek drag-and-drop zone for easy file selection.
- Client-side JavaScript to manage and display the list of selected files.
- A powerful PHP backend that automatically compresses multiple attachments into a single
.zipfile. - Secure email sending using PHPMailer and Gmail's SMTP server.
By the end of this guide, you will not only have a fully functional application but also a solid understanding of how to handle file uploads, server-side processing, and email dispatch like a pro. Let's get started!
Here is an image of the application we are going to build.
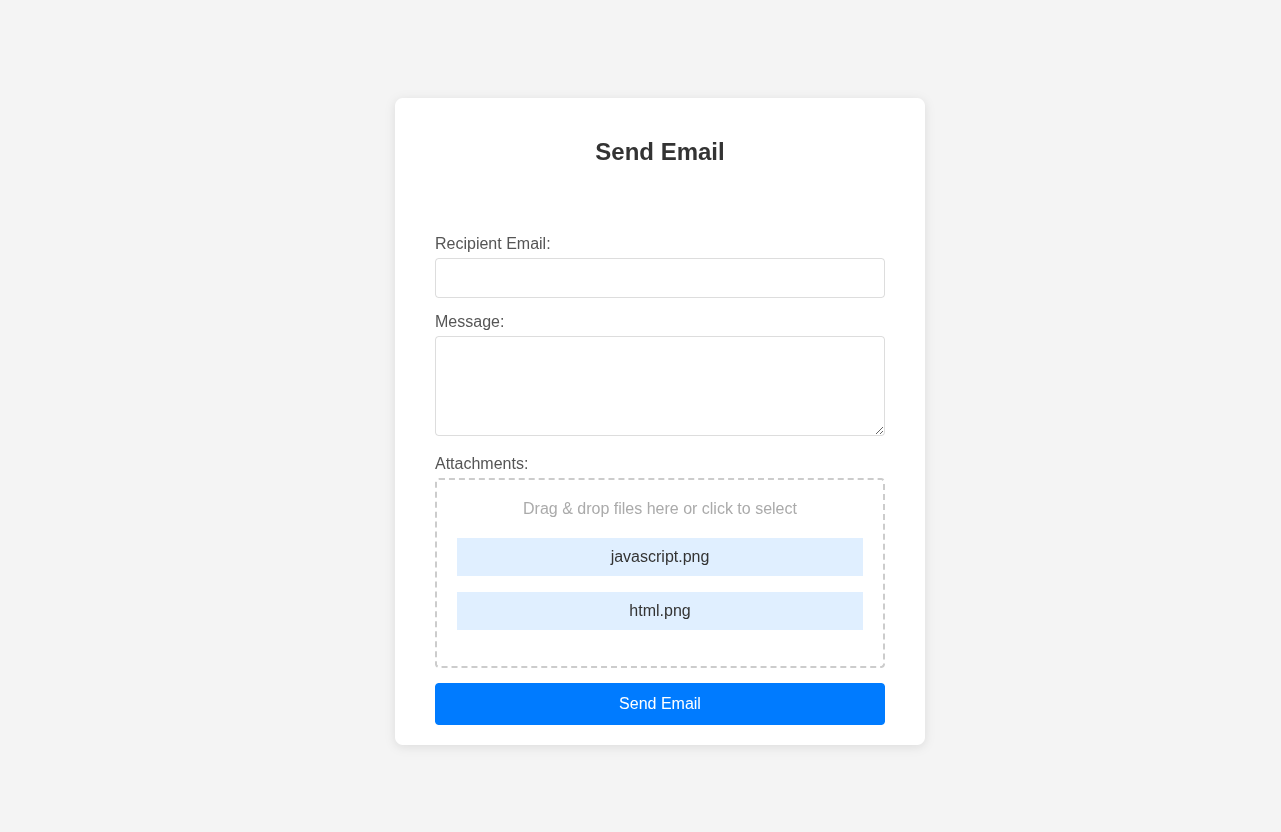
App Description
Let's see the structure of the application and what it does.
- The application has an email field to specify where the email goes (recipient).
- It has a message textarea to write the mail's text.
- It has a drop zone area in which we can drag and drop the selected files, or we can click on that area to select files using the browser's file selection dialog.
- The names of the selected files will be displayed in the drop-zone.
- The application will not accept duplicate files. This means that an already selected file will not be added to the file list if selected again.
-
The application will upload and zip the files and send them in the email we specify.
- The App uses the PHPMailer library and Google's Gmail SMTP mail server to send our emails.
Project's folder
Okay, let's proceed and create the files that you see below inside the projects-folder/ in you localhost server's directory. You can give your project folder any name you like.
But first download the PHPMailer library from Github and include the PHPMailer folder in your project-folder. PHPMailer Download Link
If the downloaded folder has a name of PHPMailer-master or something else, rename it to PHPMailer, so the name matches the folder name of this tutorial.
Next, create the file structure that you see below. Be careful to give the files exactly the same names as the ones you see.
/--projects-folder
  /--PHPMailer
  |--index.php
  |--script.js
  |--send_email.php
  |--style.css
The Index file
Okay, now that you have created the project's file structure let's see the code for each file, starting with the index.php file.
The index.php file contains the HTML Form and is our starting page. Copy and paste the code in the index.php file that you have created.
<?php
session_start();
$message = '';
if (isset($_SESSION['message'])) {
    $message = $_SESSION['message'];
    unset($_SESSION['message']);
}
?>
<!DOCTYPE html>
<html lang="en">
<head>
    <meta charset="UTF-8">
    <meta name="viewport" content="width=device-width, initial-scale=1.0">
    <title>Send Email with Attachments</title>
    <link rel="stylesheet" href="style.css">
</head>
<body>
    <div class="container">
        <h2>Send Email</h2>

        <div class="message">
            <?php if ($message) echo $message; ?>
        </div>

        <form action="send_email.php" method="post" enctype="multipart/form-data">
            <div class="form-group">
                <label for="email">Recipient Email:</label>
                <input type="email" id="email" name="email" value="" required>
            </div>

            <div class="form-group">
                <label for="message">Message:</label>
                <textarea id="message" name="message" required></textarea>
            </div>

            <div class="form-group">
                <label for="attachments">Attachments:</label>
                <div class="drop-zone" id="dropZone">
                    Drag & drop files here or click to select
                    <div class="file-list" id="fileList"></div>
                </div>
                <input type="file" id="attachments" name="attachments[]" class="drop-zone-input" multiple>
            </div>

            <button type="submit">Send Email</button>
        </form>
    </div>

    <script src="script.js"></script>
</body>
</html>
Key points in the index.php code
-
In the beginning of the file we have a block of PHP code in which we start a session , we initialize the $message variable to an empty string, and check if there is a $_SESSION['message'] variable. If it is we assign the value that the $_SESSION['message'] variable hols to the $message variable, and immediately delete the $_SESSION['message'] using unset.
The $_SESSION['message'] will be set in the send_email.php file and will hold the success message, or an error message if something goes wrong.
<?php session_start(); $message = ''; if (isset($_SESSION['message'])) { $message = $_SESSION['message']; unset($_SESSION['message']); } ?> -
In line 22 we echo the message in the screen.
<div class="message"> <?php if ($message) echo $message; ?> </div> -
In line 25 we have the form's attributes.. The action attribute is set to send_email.php which is the php file that will handle all the process. The method is set to post. And the enctype attribute is set to "multipart/form-data" to ensure that the files are sent to the server. This is mandatory.
<form action="send_email.php" method="post" enctype="multipart/form-data"> -
In line 38 we have the drop-zone. This is the area where we drop the files, or click on to select the files using the browser's file select dialog.
In line 40 we have a div element in which we display using JavaScript the selected file names.
And in line 42 we have the choose file button which is hidden by default in the css file. The important thing here is the name attribute which is set to an array name="attachments[]" to hold multiple file selections. Also setting the id="attachments" will help us to access the input element from the javascript file.
<div class="drop-zone" id="dropZone">
    Drag & drop files here or click to select
    <div class="file-list" id="fileList"></div>
</div>
<input type="file" id="attachments" name="attachments[]" class="drop-zone-input" multiple>
Okay, that's the most important stuff in the index.php file. Now let's move to the Javascript script.js file.
The Javascript script.js file
The JavaScript code handles the drag-and-drop and manual file selection features for uploading attachments, displaying the chosen files, and maintaining synchronization between the input and the display area.
const dropZone = document.getElementById('dropZone');
const fileInput = document.getElementById('attachments');
const fileList = document.getElementById('fileList');
const dt = new DataTransfer();

if (dropZone && fileInput && fileList) {
    dropZone.addEventListener('click', () => fileInput.click());

    dropZone.addEventListener('dragover', (e) => {
        e.preventDefault();
        dropZone.classList.add('dragover');
    });

    dropZone.addEventListener('dragleave', () => {
        dropZone.classList.remove('dragover');
    });

    dropZone.addEventListener('drop', (e) => {
        e.preventDefault();
        dropZone.classList.remove('dragover');
        const files = e.dataTransfer.files;
        if (files.length) {
            for(let i = 0; i < files.length; i++) {
                // Check for duplicates before adding
                const fileExists = Array.from(dt.files).some(f => f.name === files[i].name && f.size === files[i].size);
                if (!fileExists) {
                    dt.items.add(files[i]);
                }
            }
            fileInput.files = dt.files;
            updateFileList();
        }
    });

    fileInput.addEventListener('change', () => {
        const files = fileInput.files;
        // Clear the DataTransfer object and rebuild it from the input's files
        dt.items.clear();
        for(let i = 0; i < files.length; i++) {
            dt.items.add(files[i]);
        }
        fileInput.files = dt.files;
        updateFileList();
    });

    function updateFileList() {
        fileList.innerHTML = '';
        if (fileInput.files.length) {
            const filesArray = Array.from(fileInput.files);
            const fileNames = filesArray.map(file => `<p>${file.name}</p>`).join('');
            fileList.innerHTML = fileNames;
        } else {
            fileList.textContent = '';
        }
    }
}
Step-by-step explanation
-
Selecting the necessary elements
const dropZone = document.getElementById('dropZone'); const fileInput = document.getElementById('attachments'); const fileList = document.getElementById('fileList'); const dt = new DataTransfer();- dropZone... The area where users can drag and drop files.
- fileInput... The hidden <input type="file"> element that actually stores the files for submission.
- fileList... The container (e.g., <div>) where the selected file names will be displayed.
- dt.. A DataTransfer object that allows you to dynamically manage the list of files programmatically. It is essential for modifying the fileInput.files property.
-
Verifying that all elements exist
if (dropZone && fileInput && fileList) {This ensures the code only runs if all three elements are present in the HTML. It prevents runtime errors if one of them is missing.
-
Clicking the drop zone opens the file picker
dropZone.addEventListener('click', () => fileInput.click());When the user clicks on the drop zone, it triggers a click on the hidden file input, allowing them to select files from their device manually. The choose file button is set to display:none in the css file. It means it is hidden.
-
Handling the drag-over event
dropZone.addEventListener('dragover', (e) => { e.preventDefault(); dropZone.classList.add('dragover'); });- e.preventDefault()... is crucial—it allows the drop action to occur (otherwise the browser blocks it).
- A CSS class (dragover) is added to visually indicate that files can be dropped (for example, by changing the border or background color).
-
Removing the highlight when the user leaves the drop area
dropZone.addEventListener('dragleave', () => {
    dropZone.classList.remove('dragover');
});
This event fires when files are dragged out of the drop zone, and it removes the highlight effect.
-
Handling dropped files
dropZone.addEventListener('drop', (e) => {
e.preventDefault();
dropZone.classList.remove('dragover');
const files = e.dataTransfer.files;
When files are dropped:
- Default behavior is prevented (again, to allow dropping).
- The highlight is removed.
- The dropped files are accessed via e.dataTransfer.files.
-
Preventing duplicate files
if (files.length) {
for(let i = 0; i < files.length; i++) {
    const fileExists = Array.from(dt.files).some(f => f.name === files[i].name && f.size === files[i].size);
    if (!fileExists) {
        dt.items.add(files[i]);
    }
}
For each dropped file:
- It checks if a file with the same name and size already exists in dt.files.
- If not, the new file is added to the DataTransfer object.
This ensures that users don’t accidentally upload duplicates.
-
Updating the file input and file list
fileInput.files = dt.files;
updateFileList();
After processing the dropped files:
- The input’s files property is updated with the new list.
- The updateFileList() function is called to visually display the files.
-
Handling files selected via the input
fileInput.addEventListener('change', () => {
    const files = fileInput.files;
    dt.items.clear();
    for(let i = 0; i < files.length; i++) {
        dt.items.add(files[i]);
    }
    fileInput.files = dt.files;
    updateFileList();
});
When users select files using the standard file dialog:
- The existing DataTransfer list is cleared.
- All newly selected files are added to it.
- The input and file list display are updated again.
This keeps both drag-and-drop and manual uploads perfectly synchronized.
-
Displaying the file names
function updateFileList() { fileList.innerHTML = ''; if (fileInput.files.length) { const filesArray = Array.from(fileInput.files); const fileNames = filesArray.map(file => `${file.name}
`).join(''); fileList.innerHTML = fileNames; } else { fileList.textContent = ''; } }This function:
- Clears any previous file list content.
- Converts the FileList into an array.
- Maps each file to an HTML <p> element containing its name.
- Displays all selected file names in the fileList container.
The PHP file
This PHP script processes a form submission that sends an email with one or more file attachments. To make transmission more efficient and organized, all uploaded files are compressed into a ZIP archive before being sent via PHPMailer.
<?php
session_start();

use PHPMailer\PHPMailer\PHPMailer;
use PHPMailer\PHPMailer\Exception;
use PHPMailer\PHPMailer\SMTP;

require 'PHPMailer/src/Exception.php';
require 'PHPMailer/src/PHPMailer.php';
require 'PHPMailer/src/SMTP.php';

if ($_SERVER["REQUEST_METHOD"] == "POST") {
    $recipientEmail = $_POST['email'];
    $emailMessage = $_POST['message'];

    if (isset($_FILES['attachments']) && !empty(array_filter($_FILES['attachments']['name']))) {
        $zip = new ZipArchive();
        $zipFileName = 'attachments_' . time() . '.zip';
        $zipFilePath = sys_get_temp_dir() . '/' . $zipFileName;
        if ($zip->open($zipFilePath, ZipArchive::CREATE) === TRUE) {
            $fileCount = count($_FILES['attachments']['name']);
            for ($i = 0; $i < $fileCount; $i++) {
                if ($_FILES['attachments']['error'][$i] == UPLOAD_ERR_OK) {
                    $tmp_name = $_FILES['attachments']['tmp_name'][$i];
                    $name = basename($_FILES['attachments']['name'][$i]);
                    $zip->addFile($tmp_name, $name);
                }
            }
            $zip->close();

            $mail = new PHPMailer(true);

            try {
                //Server settings
                $mail->isSMTP();
                $mail->Host       = 'smtp.gmail.com';
                $mail->SMTPAuth   = true;
                // IMPORTANT: Replace with your Gmail address and an App Password.
                $mail->Username   = 'digitalfox.tutorials@gmail.com';
                $mail->Password   = 'Your 16 digit app password';
                $mail->SMTPSecure = PHPMailer::ENCRYPTION_SMTPS;
                $mail->Port       = 465;

                //Recipients
                $mail->setFrom('info@digitalfox-tutorials.com', 'Mailer');
                $mail->addAddress($recipientEmail);

                // Attachments
                $mail->addAttachment($zipFilePath, $zipFileName);

                // Content
                $mail->isHTML(true);
                $mail->Subject = 'Email with ZIP Attachment';
                $mail->Body    = nl2br(htmlspecialchars($emailMessage));
                $mail->AltBody = htmlspecialchars($emailMessage);

                $mail->send();
                $_SESSION['message'] = '<div class="success">Message has been sent successfully!</div>';
            } catch (Exception $e) {
                $_SESSION['message'] = "<div class='error'>Message could not be sent. Mailer Error: {$mail->ErrorInfo}</div>";
            }

            if (file_exists($zipFilePath)) {
                unlink($zipFilePath);
            }
        } else {
            $_SESSION['message'] = '<div class="error">Failed to create zip archive.</div>';
        }
    } else {
        $_SESSION['message'] = '<div class="error">Please select at least one file to attach.</div>';
    }
} else {
    $_SESSION['message'] = '<div class="error">Invalid request method.</div>';
}

header("Location: index.php");
exit();
PHP script step-by-step explanation
-
Start the session
session_start();This initializes a session so that messages (e.g., success or error notifications) can be stored in $_SESSION and displayed after redirection.
-
Import PHPMailer classes
use PHPMailer\PHPMailer\PHPMailer;
use PHPMailer\PHPMailer\Exception;
use PHPMailer\PHPMailer\SMTP;
These statements import PHPMailer’s main classes into the global namespace, allowing you to use them directly (e.g., new PHPMailer()) without full namespace paths.
-
Include the PHPMailer source files
require 'PHPMailer/src/Exception.php';
require 'PHPMailer/src/PHPMailer.php';
require 'PHPMailer/src/SMTP.php';
These lines load PHPMailer’s core files manually.
-
Check if the form was submitted
if ($_SERVER["REQUEST_METHOD"] == "POST") {This ensures the script only runs when the form is submitted via the POST method — preventing unauthorized direct access to the page.
-
Retrieve form data
$recipientEmail = $_POST['email'];
$emailMessage = $_POST['message'];
These capture
- The recipient’s email address.
- The message text entered by the user.
-
Check for uploaded files
if (isset($_FILES['attachments']) && !empty(array_filter($_FILES['attachments']['name']))) {This verifies that:
- The attachments field exists.
- At least one file was actually uploaded (using array_filter() to remove empty entries).
If no files are selected, the user is notified with an error message (handled later).
-
Create a ZIP archive
$zip = new ZipArchive(); $zipFileName = 'attachments_' . time() . '.zip'; $zipFilePath = sys_get_temp_dir() . '/' . $zipFileName;- A new ZipArchive object is created.
- A unique file name is generated based on the current timestamp (e.g., attachments_1731258475.zip).
- The ZIP file is stored temporarily in the system’s temp directory (retrieved using sys_get_temp_dir()).
-
Open and populate the ZIP archive
if ($zip->open($zipFilePath, ZipArchive::CREATE) === TRUE) {
$fileCount = count($_FILES['attachments']['name']);
for ($i = 0; $i < $fileCount; $i++) {
    if ($_FILES['attachments']['error'][$i] == UPLOAD_ERR_OK) {
        $tmp_name = $_FILES['attachments']['tmp_name'][$i];
        $name = basename($_FILES['attachments']['name'][$i]);
        $zip->addFile($tmp_name, $name);
    }
}
$zip->close();
Breakdown
- ZipArchive::CREATE creates a new ZIP file if it doesn’t exist.
- The script loops through each uploaded file.
- For each file: It checks for upload errors.
- Retrieves the temporary file path and the original name.
- Adds the file to the ZIP archive.
- Finally, the ZIP file is closed and saved.
-
Initialize PHPMailer
$mail = new PHPMailer(true);Creates a new instance of PHPMailer. Passing true enables exceptions for error handling.
-
Configure PHPMailer (inside try-catch)
try {
$mail->isSMTP();
$mail->Host       = 'smtp.gmail.com';
$mail->SMTPAuth   = true;
$mail->Username   = 'digitalfox.tutorials@gmail.com';
$mail->Password   = 'Your 16 digit app password';
$mail->SMTPSecure = PHPMailer::ENCRYPTION_SMTPS;
$mail->Port       = 465;
Explanation:
- isSMTP() – use SMTP protocol for sending mail.
- Host – Gmail’s SMTP server.
- SMTPAuth – enables authentication.
-
Username / Password – your Gmail address and App Password (not your normal Gmail password).
If you don't have an App Password, please read the article on how to: Send Email in PHP using PHPMailer and Gmail - SMTPSecure – sets SSL encryption.
- Port – port 465 for secure SSL communication.
-
Set sender and recipient
$mail->setFrom('info@digitalfox-tutorials.com', 'Mailer'); $mail->addAddress($recipientEmail);- Defines The sender’s email and name.
- And The recipient’s email (from the form input).
-
Attach the ZIP file
$mail->addAttachment($zipFilePath, $zipFileName);Adds the ZIP archive created earlier as an email attachment.
-
Compose the email
$mail->isHTML(true); $mail->Subject = 'Email with ZIP Attachment'; $mail->Body = nl2br(htmlspecialchars($emailMessage)); $mail->AltBody = htmlspecialchars($emailMessage);- Enables HTML formatting for the email body.
- Subject is set to a fixed descriptive string.
- nl2br() converts line breaks to <br> tags for HTML.
- htmlspecialchars() prevents HTML injection (escaping user input).
- AltBody provides a plain-text fallback.
-
Send the email and handle success
$mail->send();
$_SESSION['message'] = '<div class="success">Message has been sent successfully!</div>';
If the mail is sent successfully, a success message is stored in the session.
-
Handle errors
} catch (Exception $e) {
    $_SESSION['message'] = "<div class='error'>Message could not be sent. Mailer Error: {$mail->ErrorInfo}</div>";
}
If sending fails, an exception is caught and an error message is saved.
-
Clean up temporary files
if (file_exists($zipFilePath)) {
    unlink($zipFilePath);
}
Deletes the temporary ZIP file from the server after sending (to prevent unnecessary storage buildup).
-
Handle ZIP creation failure
} else {
    $_SESSION['message'] = '<div class="error">Failed to create zip archive.</div>';
}
If the ZIP archive could not be created, an appropriate error message is displayed.
-
Handle missing attachments
} else {
    $_SESSION['message'] = 'Please select at least one file to attach.';
}
Displayed if the user submits the form without selecting files.
-
Handle invalid request methods
} else {
    $_SESSION['message'] = 'Invalid request method.';
}
Displayed if someone accesses the script directly (not via POST).
-
Redirect back to the form
header("Location: index.php");
exit();
Finally, the user is redirected back to the main form page (index.php), where the session message can be displayed.
The CSS file
And last we have the CSS code. Copy and paste it in your styles.css file.
*{
    font-family: Arial, sans-serif;
}
body {
    background-color: #f4f4f4;
    margin: 0;
    display: flex;
    justify-content: center;
    align-items: center;
    min-height: 100vh;
}

.container {
    background: #fff;
    padding: 20px 40px;
    border-radius: 8px;
    box-shadow: 0 2px 10px rgba(0,0,0,0.1);
    width: 100%;
    max-width: 450px;
}

h2 {
    text-align: center;
    color: #333;
}

/* Form Styles */
.form-group {
    margin-bottom: 15px;
}

label {
    display: block;
    margin-bottom: 5px;
    color: #555;
}

input[type="email"],
textarea {
    width: 100%;
    padding: 10px;
    border: 1px solid #ddd;
    border-radius: 4px;
    box-sizing: border-box;
    font-size: 16px;
}

textarea {
    resize: vertical;
    min-height: 100px;
}

button {
    width: 100%;
    padding: 12px;
    background-color: #007bff;
    color: #fff;
    border: none;
    border-radius: 4px;
    cursor: pointer;
    font-size: 16px;
    transition: background-color 0.3s;
}

button:hover {
    background-color: #0056b3;
}

/* Drag and Drop Area */
.drop-zone {
    border: 2px dashed #ccc;
    border-radius: 4px;
    padding: 20px;
    /*min-height: 80px;*/
    text-align: center;
    color: #aaa;
    cursor: pointer;
    transition: border-color 0.3s, background-color 0.3s;
}

.drop-zone.dragover {
    border-color: #333;
    background-color: #f0f0f0;
}

.drop-zone-input {
    display: none;
}

.file-list{
    margin-top: 20px;
}

.file-list p {
    margin-top: 10px;
    font-size: 1em;
    color: #333;
    background-color: #e0efff;
    padding: 10px;
    /*text-align: left;*/
}

/* Message Styles */
.message {
    padding: 15px;
    margin-bottom: 20px;
    border-radius: 4px;
    text-align: center;
}

.success {
    padding: 15px;
    background-color: #d4edda;
    color: #155724;
    border: 1px solid #c3e6cb;
}

.error {
    padding: 15px;
    background-color: #f8d7da;
    color: #721c24;
    border: 1px solid #f5c6cb;
}
Conclusion
In this article, we learned how to send attachments using PHPMailer with Gmail’s SMTP server. We used JavaScript to handle the front-end functionality and PHP to power the back end.
On the front end, we implemented a drag-and-drop feature for uploading files, along with the option to select files through the browser’s file dialog. The application also includes a safeguard to prevent users from selecting duplicate files.
On the back end, we used PHP to compress the selected files into a ZIP archive and send them as email attachments using PHPMailer, creating a complete and efficient solution for handling file uploads and email delivery.
Source code
If you feel like avoiding all the copying and pasting, you can buy me a coffee and get the source code in a zip file. Get the source code
Buy me a coffee
Great Udemy Courses
 2025 ChatGPT Complete Guide: Learn Midjourney, ChatGPT 4 & More
ChatGPT Plugins + 25 Powerful AI Tools 10x Your Productivity & Creativity | ChatGPT, Generative AI, Prompt Engineering
 The Complete Full-Stack Web Development Bootcamp 2025
Become a Full-Stack Web Developer with just ONE course. HTML, CSS, Javascript, Node, React, PostgreSQL, Web3 and DApps
 Complete Modern PHP Developer Course in 2024
The modern PHP course with a project, challenges and theory. Includes SQL and MVC Framework. Get started with PHP 8!
 The Complete JavaScript Course 2025: From Zero to Expert!
Master Python by building 100 projects in 100 days. Learn data science, automation, build websites, games and apps!
 100 Days of Code: The Complete Python Pro Bootcamp
Master Python by building 100 projects in 100 days. Learn data science, automation, build websites, games and apps!
Created By Digitalfox
 Responsive navigation with working login system using PHP Mysql and Ajax
Responsive navigation menu that integrates a secure login and register system, with a forgot password action, and a contact form.
The whole system is animated in slide-in sidebars and shows up on the right side of the web-design.
Comment section
You can leave a comment, it will help me a lot.
Or you can just say hi. 😉