Zip files with php by coding a real world application
Updated: 13-May-2022 / Tags: PHP Tutorials / Views: 862
Introduction
Zip is a popular compress format that we use very often to move files through the internet.
We use zip files as attachments in our emails, we get a zip archive when we download files from a website, or we zip files so they take less space in our computer.
To zip files with php, php gives us the zipArchive object which has all the methods we need to create or edit zip archives. And it is pretty easy to do.
In this article we are going to learn how to use the php-zip module to compress files.
Let's quick say a few words on what we are going to build.
We are going to have inside a form element some check boxes and a download button. Every checkbox gives the user the option to
download a theme file.
The user can click on one or more check boxes and download them by pressing the download button.
Live Demo
Check out the demo and lets code.
Project's folder
-
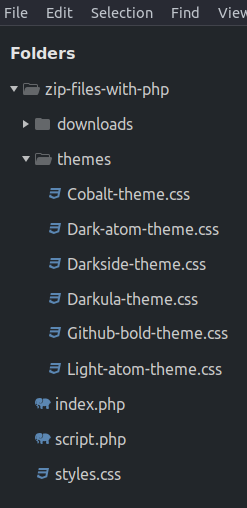
Lets walk through the project and see all the files and folders that we have.
-
I will start from the themes folder. Inside the themes folder we have the css files which are available for download.
Those files are not actually theme files, there are dummy files used for this example. -
The downloads folder is the folder where the created zip archive containing the selected css files is placed.
-
We have an index.php file. In this file we have our form.
-
We have a script.php file where we write the php code.
-
And last we have a styles.css stylesheet where we have some basic styling rules so our form looks pretty. I will not cover the css file in this article, it is not important for our example. But you can get the file if you download the source code.
The index file
In the index file we have a basic html structure, except that in line 1 we have a line of php code. In this line we require the script.php file to run every time the index file is loaded. That means that our php code will run every time the index file is loaded in the browser.
<?php require("script.php") ?>
<!DOCTYPE html>
<html lang="en">
<head>
	<meta charset="UTF-8">
	<meta name="viewport" content="width=device-width, initial-scale=1.0">
	<link rel="stylesheet" href="styles.css">
	<title>Zip files with php</title>
</head>
<body>
	<form action="" method="post">
		<h3>Select one or more theme files <br> and press download</h3>
		<?php
			$files = glob("themes/*.css");
			foreach ($files as $theme_file){
				?>
					<div class="form-field">
						<input type="checkbox" name="theme-files[]"
						value="<?php echo $theme_file ?>" \>
						<label>
							<?php echo basename($theme_file); ?>
						</label>
					</div>
				<?php
			}
		?>
		<button type="submit" name="download">Download</button>
		<p class="error"><?php echo @$error; ?></p>
	</form>
</body>
</html>
Breaking down the form element
-
In line 11 we having the opening form tag and the form attributes.
<form action="" method="post">The action attribute is left empty, that means that the form will submit it's values to the same page. That's why we require the script.php file in line 1, so we can catch the form's values.
The HTTP method is set to "post". That means that we have to use the superglobal $_POST variable in the php file to catch the values. -
In line 12 we have an info title.
-
In line 13 we opening php tags to write php code.
-
In line 14 we use the glob() function to fetch all css file paths from the themes folder and put them in the $files variable. The $files variable is now an array holding all css file paths.
$files = glob("themes/*.css");If we do a var_dump($files) we will get the below information. We see an array that holds the paths of the css files in the themes folder.
<?php array ( 0 => 'themes/Cobalt-theme.css', 1 => 'themes/Dark-atom-theme.css', 2 => 'themes/Darkside-theme.css', 3 => 'themes/Darkula-theme.css', 4 => 'themes/Github-bold-theme.css', 5 => 'themes/Light-atom-theme.css', );?> -
In lines 15-19 we have a foreach function. We are going to loop through the $files array and output a checkbox beside each file name. In line 16 we use a php closing tag to close the php code so we can write html.
foreach ($files as $theme_file){
	?>
		<div class="form-field">
			<input type="checkbox" name="theme-files[]"
			value="<?php echo $theme_file ?>">

			<label>
				<?php echo basename($theme_file); ?>
			</label>
		</div>
	<?php
}
In line 18 we have the checkbox form element. Notice the "name" attribute is set to an array, name="theme-files[]". This is because we have multiple check boxes. Every selected checkbox value will be stored in the theme-files[] array.
In line 19 we set the checkbox value to the css file's file path. This is the value that we send to the php file.
In line 22 we displaying the file name inside a label element. We use the basename() function to display only the file name and not the whole path that the $theme_file variable holds. -
In line 25 we open a php tag to switch back to php to complete the foreach function. And in line 26 we close the foreach function.
-
In line 27 we have the submit button. And in line 28 we have a p tag with a class of "error". In here we will display any error that occurs. The $error variable's value will be set in the php file.
	<button type="submit" name="download">Download</button>
	<p class="error"><?php echo @$error; ?></p>
</form>
That's all from the index file, now let's go to the php file.
The php file
In the php file we are going to catch the submitted form's data. The data that we interested in are the selected theme files and they are stored inside the theme-files[] array.
<?php
if(isset($_POST['download'])){
	$file_to_remove = glob("downloads/*.zip");
	foreach ($file_to_remove as $file) {
		unlink($file);
	}

	if(!isset($_POST['theme-files'])){
		$error = "You didn't choose any files !!!";
	}else{
		$themes = $_POST['theme-files'];

		$characters = "1234567890ABCDEFGHIJKLMNOPQRSTUVWXYZabcefghijklmnopqrstuvwxyz";
		$string_length = 4;

		$random_characters = substr(str_shuffle($characters), 0, $string_length);
		$zip_name = "Themes_{$random_characters}.zip";

		$zip = new ZipArchive();
		$zip->open("downloads/{$zip_name}", ZipArchive::CREATE);
		foreach ($themes as $file) {
			$zip->addFile($file, basename($file));
		}
		$zip->close();
		header("location: downloads/$zip_name");
	}
}
Code breakdown
-
The first thing that we have to do is to catch the submitted form data, so in line 2 we check if the submit button is pressed.
if(isset($_POST['download'])){ $file_to_remove = glob("downloads/*.zip"); foreach ($file_to_remove as $file) { unlink($file); } -
In lines 3 we fetch in an array all of the zip created file paths from the downloads folder, and in line 4 we loop through the array and delete them all using the unlink() function by passing as an argument the file's path. The purpose of this action is to delete any previous created zip file. If we don't do that we will end up with a large number of zip files in the downloads folder, which we have to delete manually.
-
Next in line 8 we are checking if the user has selected any files, if not we are setting an error message in the $error variable.
if(!isset($_POST['theme-files'])){ $error = "You didn't choose any files !!!"; } -
In line 10 and inside the else clause, which means that the user has selected at least one file, we are storing the "theme-files" array to the $themes variable. Now the $themes variable is holding the file paths of the selected files.
else{ $themes = $_POST['theme-files']; -
Next we have to create a unique file name for every zip file we create, so that there will be no conflict if by change two or more users press the download button the exact same time. It is a small change but it is possible.
		$characters = "1234567890ABCDEFGHIJKLMNOPQRSTUVWXYZabcefghijklmnopqrstuvwxyz";
		$string_length = 4;
		$random_characters = substr(str_shuffle($characters), 0, $string_length);
		$zip_name = "Themes_{$random_characters}.zip";
In line 13 we have a string that contains the English alphabet, lower and upper case, and the numbers 0-9.
In line 14 we set the number of how many characters we want from the $characters string.
In line 15 we shuffle the $characters string and we get the first 4 characters. And in line 16 we create a variable named $zip_name and we set the value to "Themes_" so the user knows what he has downloaded, and we concatenate the random characters. So every time we will have a unique zip file name.
-
In line 19 we create (instantiate), a new zipArchive object and store it in the $zip variable. The zipArchive object has a method called open() which opens a new or existing zip archive for reading, writing or modifying.
		$zip = new ZipArchive();
		$zip->open("downloads/{$zip_name}", ZipArchive::CREATE);
In line 20 we creating a new zip archive with the open method. The first argument is the file path ( including the file's name ) to where the zip file will be created. And in the second argument we have a flag that tells the method to create the archive.
-
Next we are going to use the addFile() method to add the selected files in the zip file. But we have to loop through the $themes array and add all of them. Maybe the user has selected only one file, or he has selected them all. We don't know that, and it doesn't matter, we have loop through the array.
foreach ($themes as $file) { $zip->addFile($file, basename($file)); } -
Next we use the close() method to write the zipped file on the disk, and we use a header() function to redirect the user to the created archive so the browser can download it.
		$zip->close();
		header("location: downloads/$zip_name");
	}
}
And in lines 26-27 we close the first and the second if statement.
Summary
In this tutorial we fetched the filenames from a folder and displayed them in a form next to checkboxes. By selecting those files we fetched them from the server, compressed them with the ZipArchive PHP object, and downloaded them.
Last Words
Thanks for reading, i hope you find the article helpful.
Please leave a comment if you find any error's, so i can update the page with the correct code.
Source code
Download the source code for free.
Times downloaded: 149
Buy me a coffee
Great Udemy Courses
 2025 ChatGPT Complete Guide: Learn Midjourney, ChatGPT 4 & More
ChatGPT Plugins + 25 Powerful AI Tools 10x Your Productivity & Creativity | ChatGPT, Generative AI, Prompt Engineering
 The Complete Full-Stack Web Development Bootcamp 2025
Become a Full-Stack Web Developer with just ONE course. HTML, CSS, Javascript, Node, React, PostgreSQL, Web3 and DApps
 Complete Modern PHP Developer Course in 2024
The modern PHP course with a project, challenges and theory. Includes SQL and MVC Framework. Get started with PHP 8!
 The Complete JavaScript Course 2025: From Zero to Expert!
Master Python by building 100 projects in 100 days. Learn data science, automation, build websites, games and apps!
 100 Days of Code: The Complete Python Pro Bootcamp
Master Python by building 100 projects in 100 days. Learn data science, automation, build websites, games and apps!
Created By Digitalfox
 Responsive navigation with working login system using PHP Mysql and Ajax
Responsive navigation menu that integrates a secure login and register system, with a forgot password action, and a contact form.
The whole system is animated in slide-in sidebars and shows up on the right side of the web-design.
Comment section
You can leave a comment, it will help me a lot.
Or you can just say hi. 😉