Preview validate and upload multiple files with javascript AJAX and PHP
Updated: 09-Jun-2022 / Tags: Full Stack Tutorials / Views: 1638
Introduction
Hello everyone, in this full stack tutorial we are going to build an application which is going to preview, validate, and upload multiple files, (in our case images), to the server, and we are going to use javascript and php to do the job.
We are going to have a form, so we can select our images.
We will have a client-side validation, to check the image-type and and the image-size.
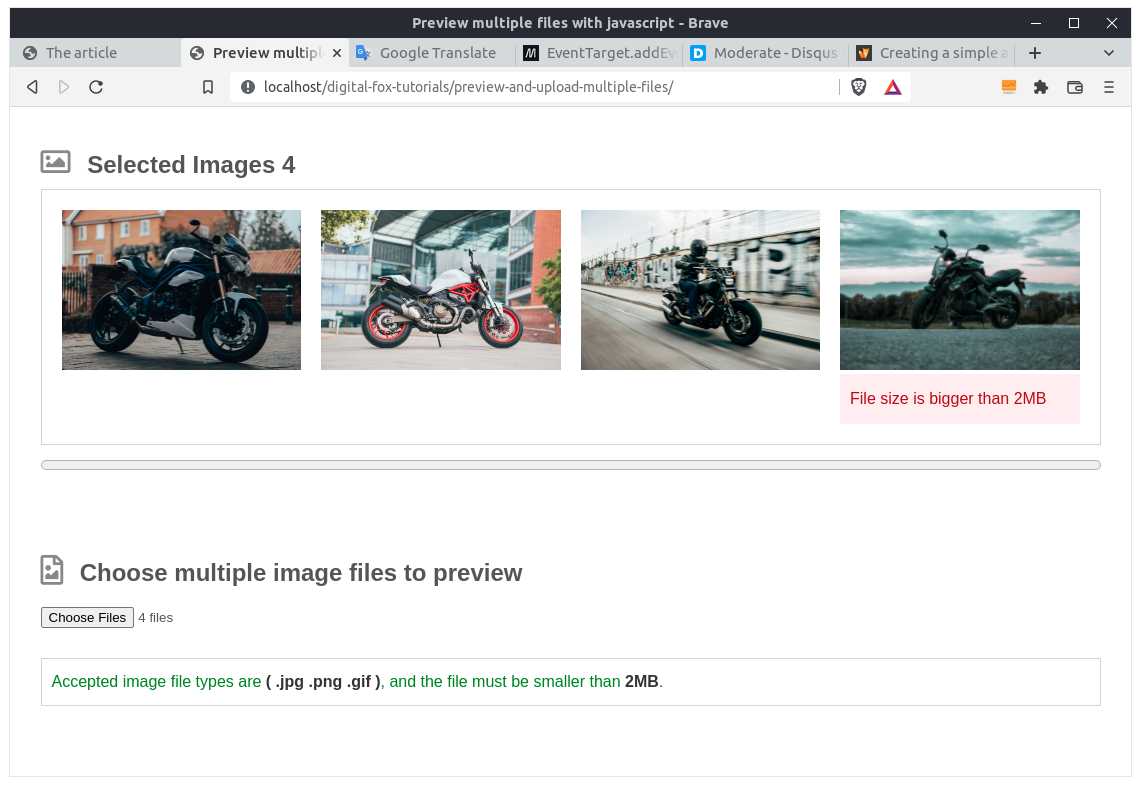
And if the validation fails, we will display error messages under the images, and we will hide the submit button,
so the user can not continue the upload process.
See image 01
Image 01
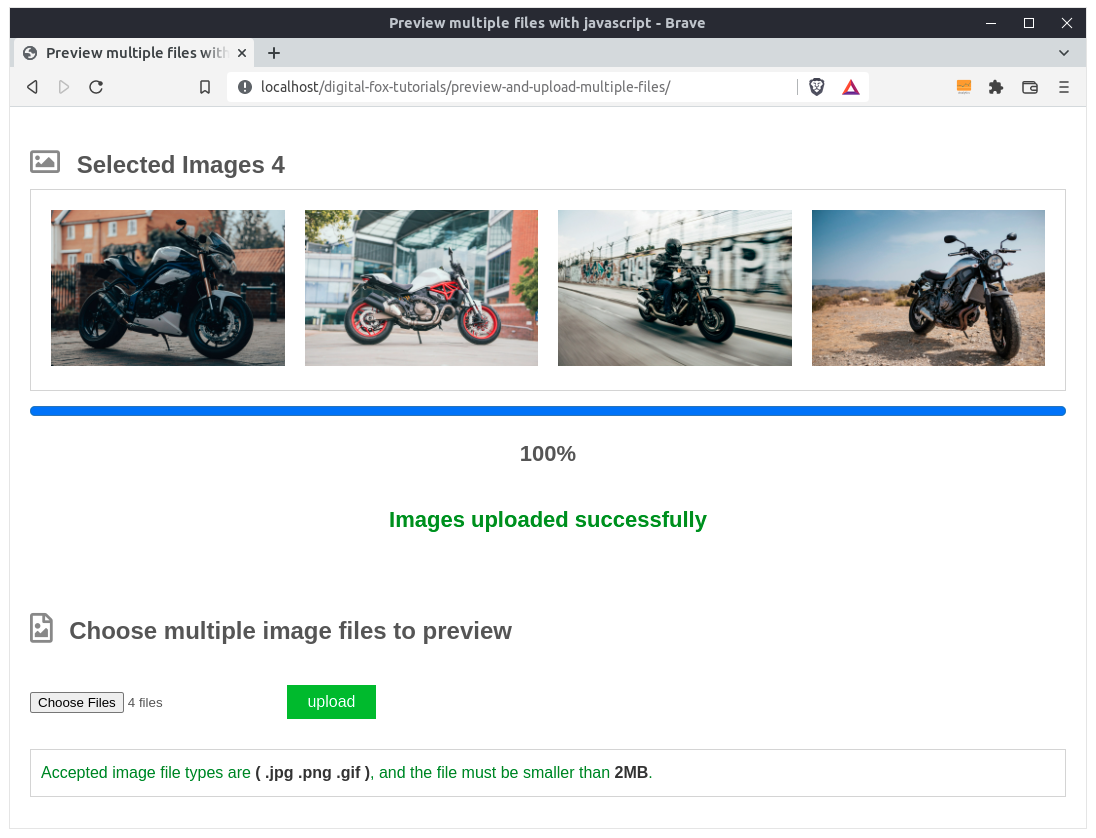
But if the images pass the validation, then we will have a progress bar that will show the percentage of the file being uploaded , and also we are going to display a success message. Image 02
Image 02
Project's folder
Lets create the projects folder and the files we need.
- Create the projects root folder inside your localhost server's directory, you can give it any name you like. I named mine upload-multiple-files/.
- Inside the project's folder we need an index.html file, this will be our homepage. In this file we are going to write all the html we need for our application.
- We need a script.js file, to write our javascript code.
- We need a script.php file, so we can write the server-side code.
- We need a styles.css file to make the homepage pretty.
- And last we need a folder to save the uploaded images, i am gonna name my folder uploads/.
The index file
In the index.html file and inside the body tags we are going to write the html elements.
<body>
	<h2>
		Selected Images
		<span class="number-of-images"></span>
	</h2>

	<div class="preview-container"></div>

	<progress value="0" max="100"></progress>
	<p class="percentage-number"></p>
	<p class="success"></p>

	<form name="upload-form" action="" method="post" enctype="multipart/form-data">
		<h2>Choose multiple image files to preview</h2>
		<input onchange="previewImages(this)" type="file" name="images" multiple>
		<input type="submit" name="upload" value="upload" id="upload">
		<h3>
			Accepted image file types are <span>( .jpg .png .gif )</span>,
			and the file must be smaller than <span>2MB</span>.
		</h3>
	</form>

	<!-- Link to the javascript file -->
	<script src="script.js"></script>
</body>
HTML code breakdown
-
In line 4, we have a span element which acts as a placeholder.
We are going to display in here the number of the selected images.
<span class="number-of-images"></span> -
In line 7 we have a div element with a class of preview-container. We are going to display with javascript
the selected images in that container.
<div class="preview-container"></div> -
In line 9 we have the progress element, in which we set the value to zero, value="0", and the max to 100, max="100". That means that the progress indicator will fill the whole width of the progress element.
In line 10 we have another placeholder in which we will show the percentage of the file being uploaded.
And in line 11 we have the success message. Ηere we are going to display a success message when the files have been successfully uploaded.<progress value="0" max="100"></progress> <p class="percentage-number"></p> <p class="success"></p> -
Lets move to the form element and break down the code.
<form name="upload-form" action="" method="post" enctype="multipart/form-data">
	<h2>Choose multiple image files to preview</h2>
	<input onchange="previewImages(this)" type="file" name="images" multiple>
	<input type="submit" name="upload" value="upload" id="upload">
	<h3>
		Accepted image file types are <span>( .jpg .png .gif )</span>,
		and the file must be smaller than <span>2MB</span>.
	</h3>
</form>
In line 13 we have the form's opening tag. We give the form a name of, "upload-form", we leave the action attribute empty, action="", we set the method to "post", and the enctype to multipart/form-data.
We will use the name attribute to target the form in the javascript file.We can omit the action, the method, and the enctype attributes, and our code will work just fine, because we will use JavaScript and AJAX to send the files to the server. -
In line 15 we have the input type="file" form element. This is the input element that let us browse our hard drive and choose the files that we want to upload. We give the element a name of "images", and it is important to include the multiple attribute, so we can select multiple files.
The input element has an onchange event-listener assigned, and triggers the previewImages() function every time we choose files. The keyword this passed in as an argument, gives us access to the input object and the selected files.
We are going to define the function in the javascript file. - In line 16 we have we have the form's submit button.
- And in line 17 we display an info to the user of what files are acceptable. The application accepts files with extension .png, .jpg, .gif, and those files have to be smaller than 2MB.
-
And in line 24 we have the script tag that links the javascript file with the index file.
<script src="script.js"></script> - This is all the html that we have in the index file. Now lets move to the javascript file.
The JavaSript file
In the javascript file we are going to set some global variables, which we will use throughout the code.
And we will write three functions.
- We are gonna have a function called previewImages(). This function is going to populate the "preview-images" placeholder with the selected images.
- We are gonna write a function called clearPage(). This function will reset every html element that is manipulated with javascript during the preview or upload process.
- And we will have an onsubmit event-listener that will run a function every time someone presses the submit button. This function will track the upload progress, and will send the files to the server.
The first thing that we have to do in the "script.js" Javascript file is to set some global variables which will hold the elements that we need access to in the script.
let previewContainer = document.querySelector(".preview-container");
let uploadButton = document.querySelector("#upload");
let success = document.querySelector(".success");
let progress = document.querySelector("progress");
let percentageNumber = document.querySelector(".percentage-number");
let numberOfImages = document.querySelector(".number-of-images");
- In line 1 we are targeting the "preview-container" class name. This is the div element that will be populated with the selected images.
- In line 2 we are targeting the form's submit button.
- In line 3 we are targeting the success placeholder.
- In line 4 we are targeting the progress element.
- In line 5 we are targeting the placeholder which will show the upload percentage number.
- And last in line 6 i need access to the placeholder that shows the number of selected images.
Now that we have set our global variables let's write our first function and that is the previewImages
function which is executed every time when we selecting files. The function will grab the selected images from the
input element and will add them in the "preview-container", so we will have an instant preview.
The function will also validate the image size and type, and if the validation fails we display the user an error.
function previewImages(input){
	clearPage();
	let imagesArray = input.files;
	numberOfImages.innerHTML = imagesArray.length;

	if(imagesArray.length > 0){
		for(let file of imagesArray){
			let reader = new FileReader();
			reader.onload = function(){
				let image = new Image();
				image.src = this.result;
				let container = document.createElement("div");
				container.appendChild(image);

				if(file.size > 2 * 1024 * 1024){
					let info = document.createElement("div");
					container.appendChild(info);
					info.innerHTML = `
						<p class='error'>
							File size is bigger than 2MB
						</p>`;
					uploadButton.style.display = "none";
				}

				let allowedImageTypes = ["image/jpeg", "image/gif", "image/png"];
				if(!allowedImageTypes.includes(file.type)){
					let info = document.createElement("div");
					container.appendChild(info);
					info.innerHTML = `
						<p class='error file-error'>
							Allowed file types are .png .gif .jpeg
						</p>
					`;
					uploadButton.style.display = "none";
				}
				previewContainer.appendChild(container);
			}
			reader.readAsDataURL(file);
		}
	}
}
Breakdown the previewImages() function
Let's breakdown the function line by line.
-
In line 8 we have the function's declaration. The input variable will give us access to the input element (object).
function previewImages(input){ -
In line 9 we have a function called clearPage.
The function will reset all html elements to their initial state. To explain it better,
the function will clear any previous preview, and all placeholder elements that their content is populated, or modified
with javascript. We are going to write the clearPage function right after we finish the previewImages function.
clearPage(); -
In line 10 we get access to the selected files with the .files property, and we store them in the imagesArray variable.
The .files property is a FileList object that holds our selected files. We can work with a FileList object as we would with an array.
let imagesArray = input.files; -
Next in line 11 we counting with the .length property how many images is the imagesArray holding,
and we populate the "number-of-images" placeholder. If we selecting 4 images, the number will be 4.
numberOfImages.innerHTML = imagesArray.length; -
In line 13 we use again the .length property in an if statement to check if the imagesArray is not empty.
if(imagesArray.length > 0){ -
If the if condition is true, and there are files selected, we are going to loop through the images array
with a for of loop in line 14, and create a FlieReader object to to read each file in line 15.
for(let file of imagesArray){
	let reader = new FileReader();
With the FileReader object we can read the contents of a file that is selected with an HTML input file element. We can not read files directly from the computers filesystem. -
The FileReader object has an onload property, which fires when the browser
has finished reading the file. We are going to set it equal to a function.
So every time the browser reads a file, a function will run in line 16.
reader.onload = function(){ -
Now inside the function in line 17, i will create an image object for every file that the browser reads.
And in line 18, i will assign in the new created image's file's source attribute, the file's content.
The FileReaders .result property, holds the content of the file that the browser has finished reading.let image = new Image(); image.src = this.result; -
Next i will create a div element in line 18.
And i will place the image inside in line 19. I am doing this because later on when we validate the images, i will need that container
to create a paragraph element and display any error message under the image.
		let container = document.createElement("div");
		container.appendChild(image);
In the next two code-blocks we are going to validate the files, first the size and next the type.
-
In line 22, we are going to check if the file size is greater than 2MB.
If so, i will create again a div element in line 23, and place it in the same container with the image. The new div element will be created under the image. Every new created element is placed after the existing elements in the same container, this is the default actionIn line 26 and inside the new created div i will create a paragraph with a class of "error" in which i will display the error message.
And in line 29, we target the submit button and hide it. The user wont be able to upload files that do not pass the validation.if(file.size > 2 * 1024 * 1024){ let info = document.createElement("div"); container.appendChild(info); info.innerHTML = ` <p class='error'> File size is bigger than 2MB </p>`; uploadButton.style.display = "none"; } -
In this code-block we are going to validate the file type of the selected images.
In line 33 we check if the selected file type is not included in the array.
In line 32 we have an array named allowedImageTypes that contains the image types that we allowing the user to upload.
If the file type in not in the array, we will do the same thing as we did in the previous if statement. We are going to create a new div element to display the error, and hide the submit button in line 34-42.let allowedImageTypes = ["image/jpeg", "image/gif", "image/png"]; if(!allowedImageTypes.includes(file.type)){ let info = document.createElement("div"); container.appendChild(info); info.innerHTML = ` <p class='error file-error'> Allowed file types are .png .gif .jpeg </p> `; uploadButton.style.display = "none"; } -
In line 43 we are going to add all new created elements, that is the images and errors if any, in the "preview-container".
We are still inside the onlaod property function.
previewContainer.appendChild(container); -
And last outside the onload function but still inside the for-of loop we use the readAsDataURL property to read the file's data.
reader.readAsDataURL(file);
The next function that we are gonna write is the clearPage() function. As we said earlier the clearPage() function is the first thing that runs when the previewImages() function runs, and will reset the html elements that we manipulate with javascript to their initial state.
function clearPage(){
	previewContainer.innerHTML = "";
	uploadButton.style.display = "inline-block";
	success.innerHTML = "";
	progress.value = 0;
}
Breakdown the clearPage function
- In line 2 we remove any previous displayed images from the "preview-container", by setting the innerHTML to an empty string "".
- In line 3, if there was any error from a previous selection and we hid the submit button, now we are going to make it visible again.
- In line 4 we display a success message after a successful upload, so here we clear the success message, and in line 5 we are setting the progress value to 0.
The third and last function will run when the "onsubmit" event-listener is triggered. In this function we are going to set up the code to make the progress bar to work, and we are going to send the files (images), to the server and in the php file.
document.forms["upload-form"].addEventListener("submit", function(event){
	event.preventDefault();
	let images = this.images.files;

	if(images.length == 0){
		return;
	}

	let formdata = new FormData();
	for(let i = 0; i < images.length; i++){
		formdata.append("data[]", images[i]);
	}

	let http = new XMLHttpRequest();
	http.upload.onprogress = function(event){
	  let percent = (event.loaded / event.total) * 100;
	  progress.value = Math.round(percent);
	  percentageNumber.innerHTML = progress.value + '%';
	}

	http.onload = function(){
		if(this.readyState == 4 && this.status == 200){
			let response = this.responseText;
			if(response.trim() == "success"){
				success.innerHTML = ` Images uploaded successfully `;
			}
		};
	}
	http.open('post', "script.php", true);
	http.send(formdata);
});
onsubmit function breakdown
-
In line 1
we are going to target the upload form using the form's name, "upload-form". We are going to add
an onsubmit event-listener to the target, and every time someone clicks on the upload button a
function will run. I will pass to the function as an argument the event object function(event) .
document.forms["upload-form"].addEventListener("submit", function(event){ -
In line 2
The event object has a method called preventDefault().
The preventDefault() method stops the form submitting the data to the server,
so we can work with the data in the javascript file.
event.preventDefault(); -
In line 3
We are going to store the selected images to a variable named images, so
we can work easier with the files.
let images = this.images.files;The this keyword gives us access to the object it belongs. In our case here it belongs to the upload form, and we can access the input element by its name this.images. The input type="file" element (object), has a property called .files. And as we said in the previewImages function, this property is holding the selected files.
-
Next in line 5
we will check if there are files selected.
We will check the length of the images array and if it is zero, we will stop the function here with the return keyword.
There is no point to let the function run if there are no files selected.
if(images.length == 0){ return; } -
In line 9 we creating a FormData object to structure our files as an html form would,
that is in "key","value" pairs.
This is important, we have to use a FormData object, else we can not send the files to the sever.let formdata = new FormData(); -
Next in line 10 we have to add the images into the formdata object.
For that i will use a for loop to go through every image file, and with the use of the .append method we will add
the images in the FormData object in line 11.
for(let i = 0; i < images.length; i++){
	formdata.append("data[]", images[i]);
}
The .append method takes two arguments. The first argument is the "key", or the "name", of the entry, and the second argument is the value.
This is a "key","value" pair structure. In our case here we use an array as the "name" because we want to store multiple files. And going through the images array we append every file to the formdata. -
Next in line 14 we are going to create an xml-http-request object not only to send the images
to the php file, but also to calculate the upload progress and animate the
progress bar.
let http = new XMLHttpRequest(); -
In line 14 to 18 we will write the code to make the progress element to work.
The xml-http-request object has a property called .upload. We can assign an onprogress event-listener to the .upload property and track the upload progress. Every time the onprogress listener is fired a function runs in line 14. But we also need access to the event object so we will pass it in as an argument (event).http.upload.onprogress = function(event){ let percent = (event.loaded / event.total) * 100; progress.value = Math.round(percent); percentageNumber.innerHTML = progress.value + '%'; }- In line 15 we will divide the event.loaded property with the event.total property, and multiply the result by 100. This will give us the percentage number each time the onprogress event is fired, that is every 100-200 milliseconds give or take.
- In line 16 we round the percentage number to an integer.
- And in line 17 we target the "percentage-number" placeholder and display the number.
-
In line 21 to 28 we will catch the severs response.
http.onload = function(){ if(this.readyState == 4 && this.status == 200){ let response = this.responseText; if(response.trim() == "success"){ success.innerHTML = ` Images uploaded successfully `; } }; }- In line 21 the .onload property is firing a function when the transaction with the server has been completed successful.
- To have a successful response the .readyState property must return a value of 4, and the .status a value of 200. In line 22.
- In line 23 we will use the .responseText property to get the server's response.
- In line 24 we will check if the response from the server is the string "success". If so we target the success placeholder and display the success message in line 25.
-
In line 29 we will use the .open() method to prepare the request.
http.open('post', "script.php", true);- The .open() method takes three arguments.
- The first argument is the http method, we use here post.
- The second argument is the php file that is going to handle the request.
- And the third argument is the keyword true, that means that the request will be handled asynchronous.
-
And last we use the .send() method and pass in the formdata object to execute the request and send
the data to the server.
http.send(formdata);
This is all the code that we need in the javascript file. Now lets go to the php file and catch the ajax request.
The PHP file
In the script.php file we are going to catch the uploaded files and move them to the uploads/ folder.
<?php
	if(isset($_FILES['data'])){
		$images = $_FILES['data'];

		$names = $images['name'];
		$tmp_names = $images['tmp_name'];
		$folder = "uploads/";

		$upload_data = array_combine($tmp_names, $names);
		foreach ($upload_data as $temp_name => $image_name) {
			move_uploaded_file($temp_name, $folder.$image_name);
		}

		echo "success";
	}
PHP code breakdown
- In line 2 we check first if the $_FILES variable which holds the images array is submitted.
-
If this is true i am going to assign the content of the $_FILES variable to a variable named $images in line 3.
Now the $images variable is holding a multidimensional associative array which holds the name, the image type, the temporary location tmp_name, the error, and the size of the uploaded images. -
To move the uploaded files to the uploads/ folder we need the names and the temporary locations of the uploaded files.
In line 5 the $images['name'] variable is holding an array of all the selected file names. We will store the names in a variable called $names.$names = $images['name'];
-
We do the same thing with the $images['tmp_name'] array, in line 6.
$tmp_names = $images['tmp_name'];
-
In line 7
we create a variable that holds the location to where we move the files. That is the uploads/ folder.
$folder = "uploads/";
-
In line 7
we take the $names array, and the $tmp_names array and combine them together.
We will use the array_combine() function which takes the two arrays we want to combine as parameters.$upload_data = array_combine($tmp_names, $names);
The array_combine() function will return an associative array. The keys of the returned array are the values from the first parameter, and the values are the values of the second parameter. Hope it make sense.
So the order in which we pass the arrays as arguments in the array_combine() function matters.
-
In line 10
we will use a foreach() function to loop through the new created $upload_data array.
In every iteration the $temp_name variable will hold the key, and the $image_name variable will hold the image's name.foreach ($upload_data as $temp_name => $image_name) { move_uploaded_file($temp_name, $folder.$image_name); }
Inside the loop in line 11 we use the move_uploaded_file() function and pass in as the first argument the $temp_name, and as the second argument the whole file path, that's why we concatenate the $folder with the $images variable, $folder.$image_name.
-
And when the files are moved in the uploads folder, we send to the javascript file the
server's response, which is the string "success";
echo "success";
And that's all the code we need in the php file. Now there is a file left and that is the styles.css
The CSS file
I will not cover the css file, it is not important for our application to work. It exists only to make our homepage prettier.
*{
	margin: 0;
	padding: 0;
	box-sizing: border-box;
}
body{
	font-family: sans-serif;
	min-height: 100vh;
	color: #555;
	max-width: 1100px;
	margin: 0 auto;
	padding: 20px;
}
progress{
	width: 100%;
	display: block;
	margin-top: 10px;
	height: 20px;
}
.percentage-number{
	margin-top: 20px;
	font-weight: bold;
	font-size: 22px;
	text-align: center;
}
.far, .fas{
	font-size: 30px;
	display: inline-block;
	margin-right: 10px;
	color:  #888;
}
.preview-container{
	display: grid;
	grid-template-columns: repeat(auto-fit , minmax(150px, 1fr));
	grid-gap: 20px;
}
img{
	width: 100%;
	background-color: #f4f4f4;
}
h2{
	margin-top: 20px;
	margin-bottom: 10px;
}
.preview-container{
	padding: 20px;
	border: thin solid #d4d4d4;
	/*margin-top: 20px;*/
}
.preview-container img:hover{
	cursor: pointer;
	box-shadow: 0 5px 5px rgba(0, 0, 0, 0.3);
}
.image-info img{
	background-color: #f4f4f4 !important;
}
.image-info p{
	font-weight: bold;
}
.image-info i{
	cursor: pointer;
	color: #b85b5b;
}
.image-info .error{
	color: red;
	font-weight: bold;
	font-size: 15px;
	margin-top: 10px;
}
#upload{
	border: none;
	padding: 8px 20px;
	font-size: 16px;
	display: inline-block;
	margin-top: 20px;
	cursor: pointer;
	background-color: #00ba0f;
	color: #fff;
}
#upload:hover{
	background-color: #14761c;
}
#upload:active{
	background-color: red;
}
form{
	margin-top: 80px;
}
form h2{
	margin-bottom: 20px;
}
form h3{
	font-size: 16px;
	margin-top: 30px;
	font-weight: normal;
	line-height: 26px;
	color: #0a8414;
	padding: 10px;
	border: thin solid #d4d4d4;
}
form h3 span{
	color: #333;
	font-weight: bold;
}
.error{
	color: #af0606;
	padding: 10px;
	line-height: 30px;
	background-color: #ffedf0;
}
.file-error{
	background-color: #e4e4e4;
}
.success{
	color: #008e00;
	font-size: 22px;
	font-weight: bold;
	margin-top: 40px;
	text-align: center;
}
Summary
And that's it. In this tutorial we saw how to preview multiple selected files and send them to the server using javascript and php.
Last Words
Thanks for reading, i hope you find the article helpful.
Please leave a comment if you find any error's, so i can update the page with the correct code.
Source code
Download the source code for free.
Times downloaded: 212
Buy me a coffee
Great Udemy Courses
 2025 ChatGPT Complete Guide: Learn Midjourney, ChatGPT 4 & More
ChatGPT Plugins + 25 Powerful AI Tools 10x Your Productivity & Creativity | ChatGPT, Generative AI, Prompt Engineering
 The Complete Full-Stack Web Development Bootcamp 2025
Become a Full-Stack Web Developer with just ONE course. HTML, CSS, Javascript, Node, React, PostgreSQL, Web3 and DApps
 Complete Modern PHP Developer Course in 2024
The modern PHP course with a project, challenges and theory. Includes SQL and MVC Framework. Get started with PHP 8!
 The Complete JavaScript Course 2025: From Zero to Expert!
Master Python by building 100 projects in 100 days. Learn data science, automation, build websites, games and apps!
 100 Days of Code: The Complete Python Pro Bootcamp
Master Python by building 100 projects in 100 days. Learn data science, automation, build websites, games and apps!
Created By Digitalfox
 Responsive navigation with working login system using PHP Mysql and Ajax
Responsive navigation menu that integrates a secure login and register system, with a forgot password action, and a contact form.
The whole system is animated in slide-in sidebars and shows up on the right side of the web-design.
Comment section
You can leave a comment, it will help me a lot.
Or you can just say hi. 😉